High-quality product visuals can attract prospective buyers to explore the item further. You can’t achieve professional-looking images without proper editing. The key is representing your items as perfectly as possible without over-editing. But which professional software have you decided to use for editing product images? Adobe Lightroom is an easy-to-use software that allows for a basic level of editing of a bulk number of images. Photographers love this application due to its built-in presets and dozens of handful features and tools for quick editing. Let’s learn step-by-step how to edit product photos in Lightroom.
What is Adobe Lightroom?

Adobe Lightroom is an industry-standard photo editing application that allows you to organize, manage, process, edit, and finally retouch different kinds of visuals. Photographers and photo enthusiasts are fans of this versatile multi-platform software. You can batch-process thousands of product images within one session. This non-destructive photo editor comes with a very well-designed interface. So now, How to edit product photos in Lightroom? Well to know that even if you have never used the tool before, learning the basic features and functions will take only a few hours.
Why Use Lightroom for Product Photo Editing?
Hundreds of product photo editing software are available. Why should you use Adobe Lightroom? Why not others? Let’s figure out why:
Non-destructive Editing
Adobe Lightroom lets users alter an image without affecting the original raw file. You can go back and redo or undo at any point during the post-production session. It allows you to adjust and enhance the item image without permanently changing the original file.
Batch Processing
This versatile multi-platform application can batch-process a vast number of images at a time. You can apply the same edits to multiple photos simultaneously. This especially comes in handy for eCommerce store goods’ images that need automating repetitive tasks. It will save you time and effort.
User-friendly Interface
Most professional photographers and beginners use Adobe Lightroom due to its simple interface. It comes with various easy-to-use sliders and presets for fast editing. The software has all the basic settings to quickly clean up anything in your photos.
You may also like to read… How to Outsource Product Photo Editing for E-commerce
Organizational Tools
Organizing images in Adobe Lighting is straightforward. It comes with a keyword hierarchy system to categorize images. Plus, the software has a catalog management system to track all the changes you make to your photos. You can also add keywords or labels to images to describe their content.
12 Easy Steps to Edit Product Photos in Lightroom
Whether your product images need basic or complex editing, follow this step-by-step guideline, on how to edit product photos in Lightroom to give your product a professional and well-polished look.
Step_01: Importing Product Image into Lightroom Library
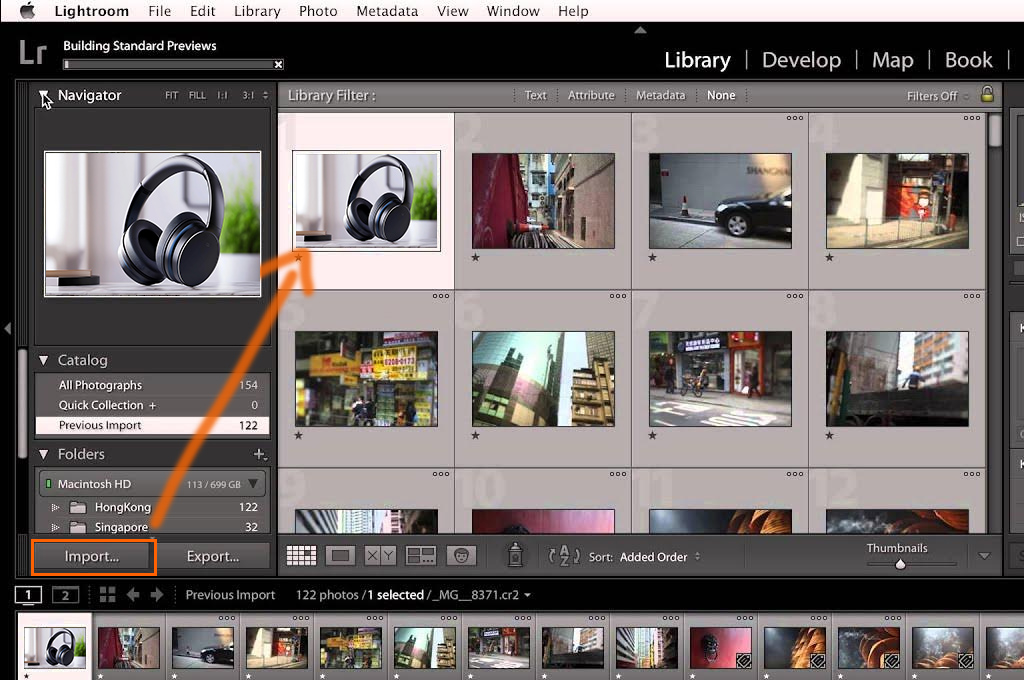
- Launch the Adobe Lightroom application on your PC or laptop. Navigate to the top right corner of the screen and select the library module. Then, tap on the import icon from the bottom-left corner.
- When the image dialog box pops up, select the image source. After choosing the item photograph, create a virtual copy of the main image file.
- Navigate to the “Photo” panel from the top left corner and select “Create Virtual Copy” Now, your original visual will be safe.
Step_02: Resizing the Image
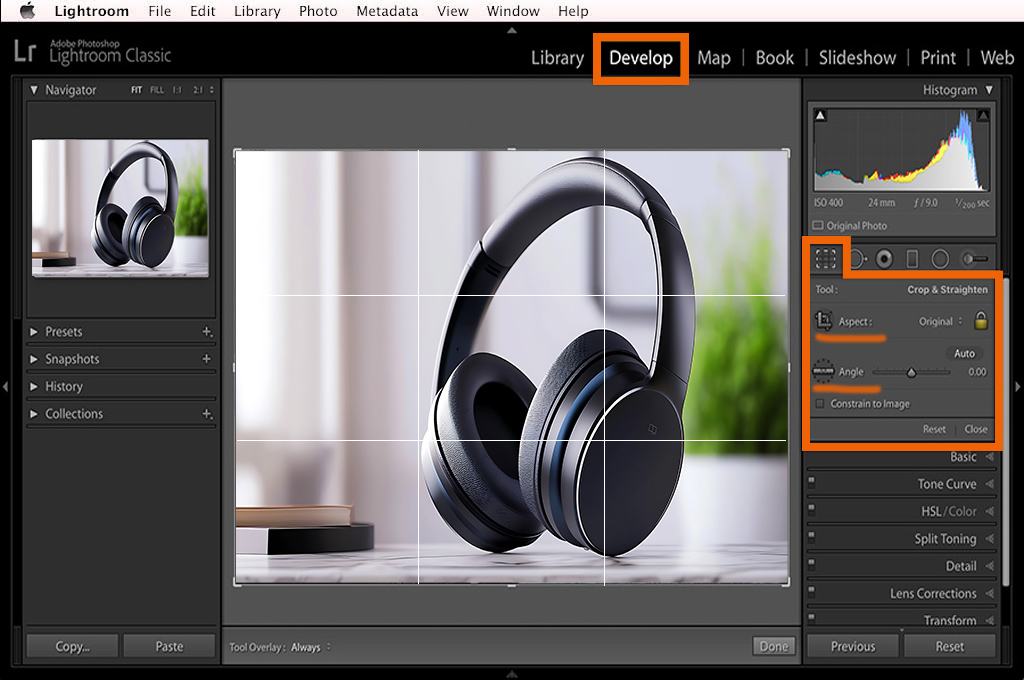
- Most e-commerce item images must be cropped before uploading them to any e-commerce platform to achieve the required dimensions.
- Tap on the Crop and Straighten tool from the right side of the Develop module. The shortcut key is “R”
- Various cropping options will pop up on the screen. Select your preferred preset aspect ratio from the Aspect menu. Or customize it on your own.
- You can also utilize the “Constrain Crop” function by sliding different options left or right based on your requirements.
Step_03: Adjusting Exposure and Contrast
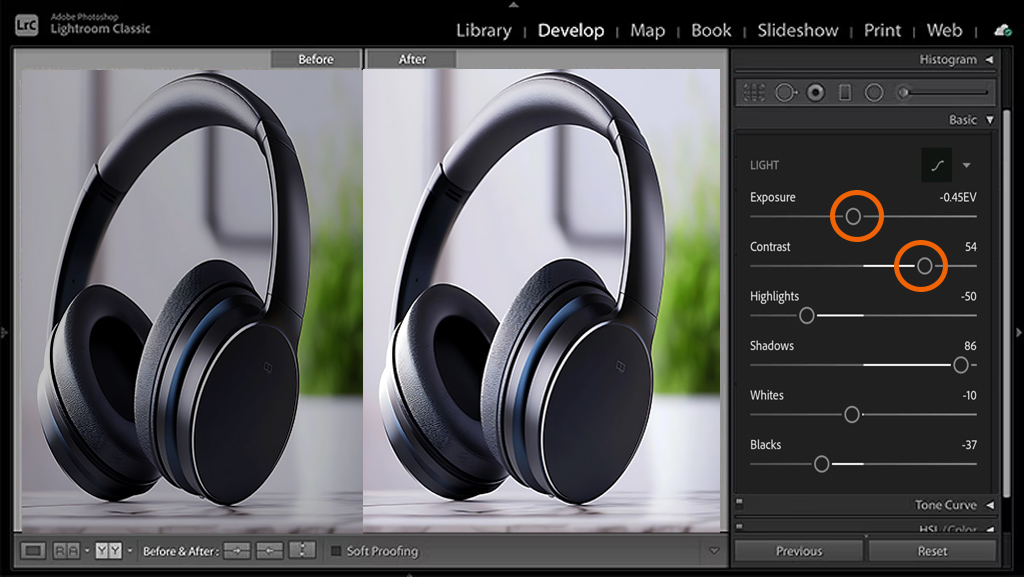
- Balancing the exposure and contrast of product images is necessary as they affect the item’s appearance.
- You may need to adjust the lightness or darkness of the entire e-commerce goods’ photo to highlight special features or benefits.
- Open the “Basic” panel and adjust the exposure and contrast option by moving the slider left or right. Be cautious during the adjustment to avoid losing shadow detail.
- Also, you can utilize the “Tone Curve” panel to change the overall brightness and contrast. The primary benefit is that it gives you access to control the curve of each color channel separately.
You may also like to read… How Long Does it Take Photographers to Edit Photos?
Step_04: Correcting White Balance
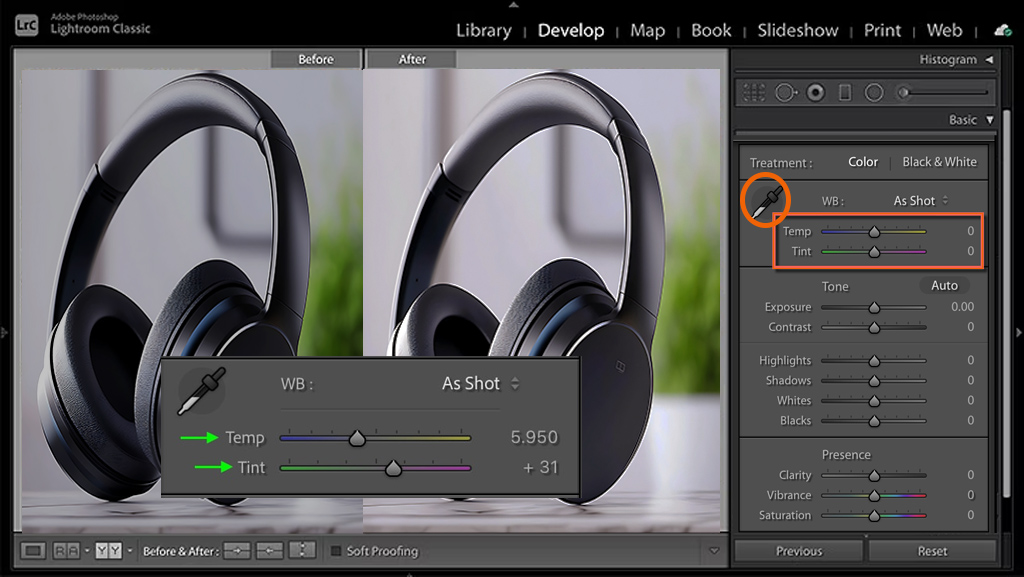
- Most experts recommend adjusting the white balance using the camera settings. It helps you avoid wrong color casts. But if it still needs improvement, do it during the post-production.
- Adjusting the white balance for e-commerce photos is vital. You don’t want it to look extremely warm, cool, or tinted.
- Go to the Basic panel and tap the eyedropper tool to choose a neutral area in your product image. It will correct the color temperature of the entire photo. Move the slider left or right based on your preference.
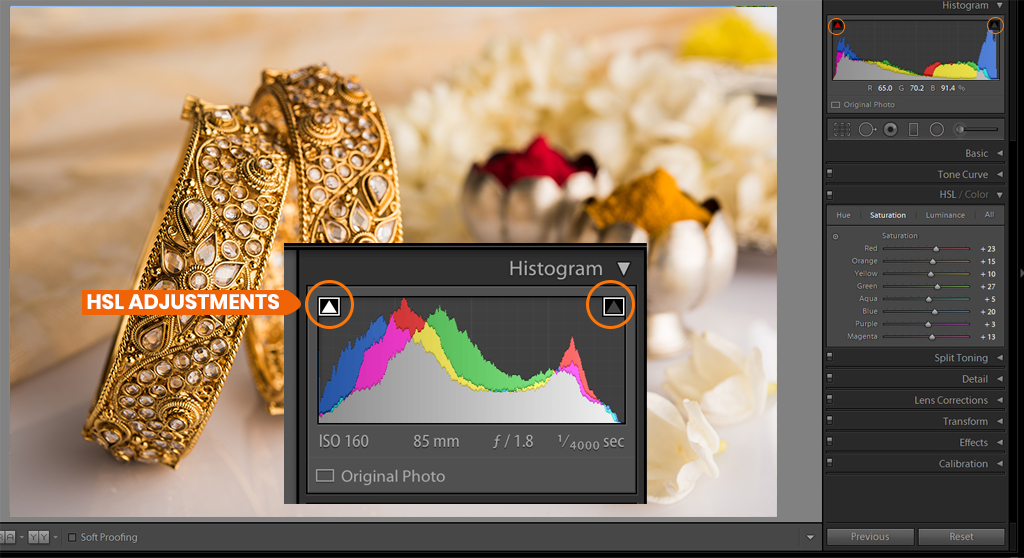
Step_05: HSL Adjustments
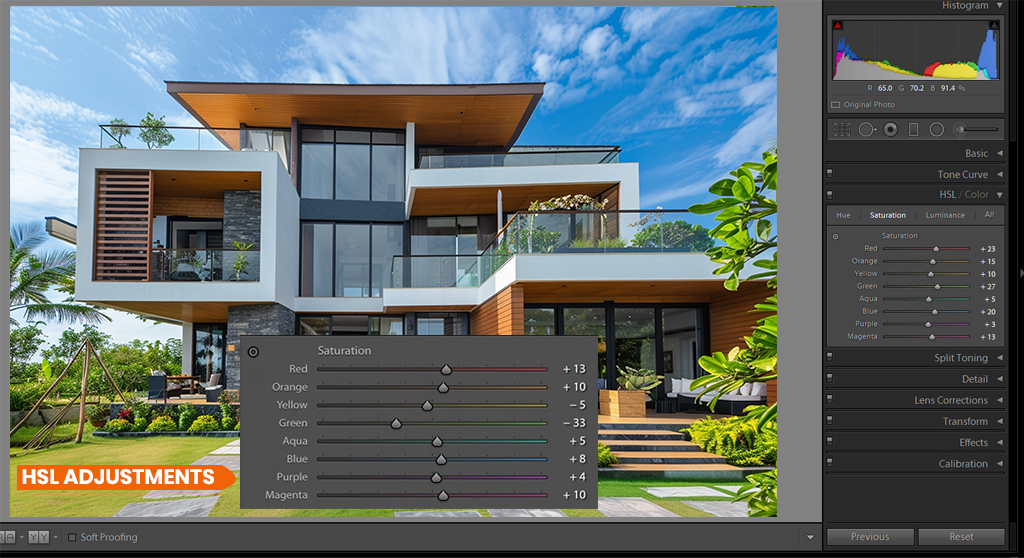
- The complete form of HSL is Hue, Saturation, and Luminance. It allows you to adjust color tones and grade the color within the image.
- Do your e-commerce photos reflect, or do you have lighting issues? HSL is a perfect solution.
- Navigate to the HSL panel below the “Mixer” tab. You can adjust the color tone in two ways. Select the “All” option from the upper right corner to change all color options simultaneously.
- Alternatively, adjust the Hue, Saturation, and Luminance separately by scrolling the slider left or right.
Step_06: Shadow and Highlights Correction
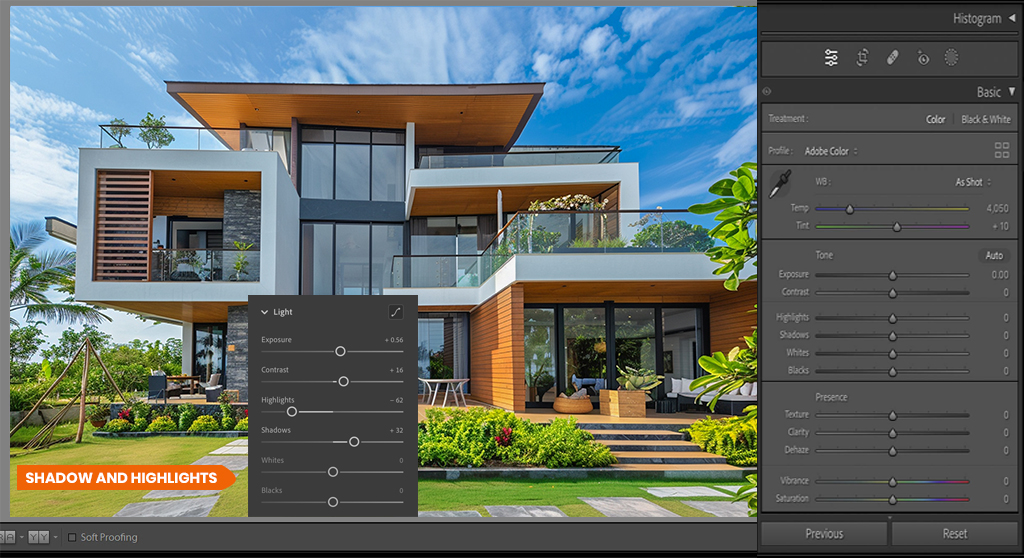
- Shadows are considered dark elements in an item photo, whereas highlights are known as bright parts.
- Go to the “Tone” section below the Basic Panel of the Develop Module and adjust the shadow intensity using the “Shadows” slider.
- Move the slider left or right to hide or reveal details lost in the dark areas of the product image without washing out the photo.
- Does your product image have any excessive bright or dark spots? Use the Highlights function to adjust and recover lost detail.
Step_07: Noise Reduction

- Your e-commerce items’ images may contain noise from poor lighting conditions, high ISO, etc.
- You can use the “Noise Reduction” function to decrease noise in part spots of a photo without affecting the overall sharpness of the whole image.
- Scroll the slider right to decrease the noise. Fine-tune the adjustment to avoid overdoing it.
- The process should be smooth. Don’t remove the entire noise. Rather, decrease it to that level where the product image looks distraction-free.
You may also like to read… Different Types of Photo Editing for E-commerce
Step_08: Lens Correction
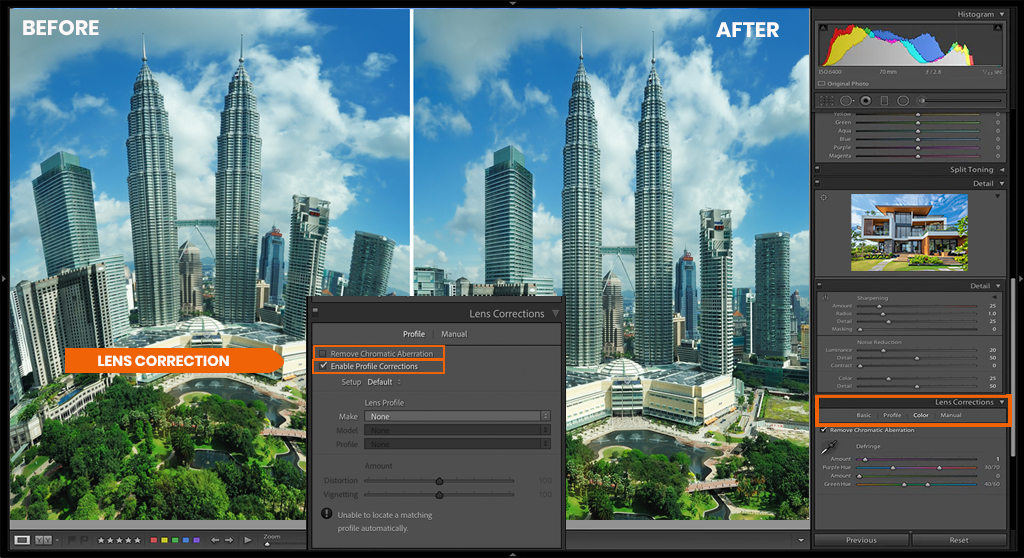
- Carefully review your e-commerce items’ images. Do they have any lens issues like distortion, chromatic aberration, or vignetting? The overall look of the photo may appear unnatural.
- The best solution is to use the lens correction tool. It can correct common lens aberrations. Tap on the “Lens Correction” function from the Develop module.
- While keeping the function in the basic mode, tick marks the “Enable Profile Correction” and “Remove Chromatic Aberration” options.
Step_09: Fine-tuning, Masking, and Local Adjustments
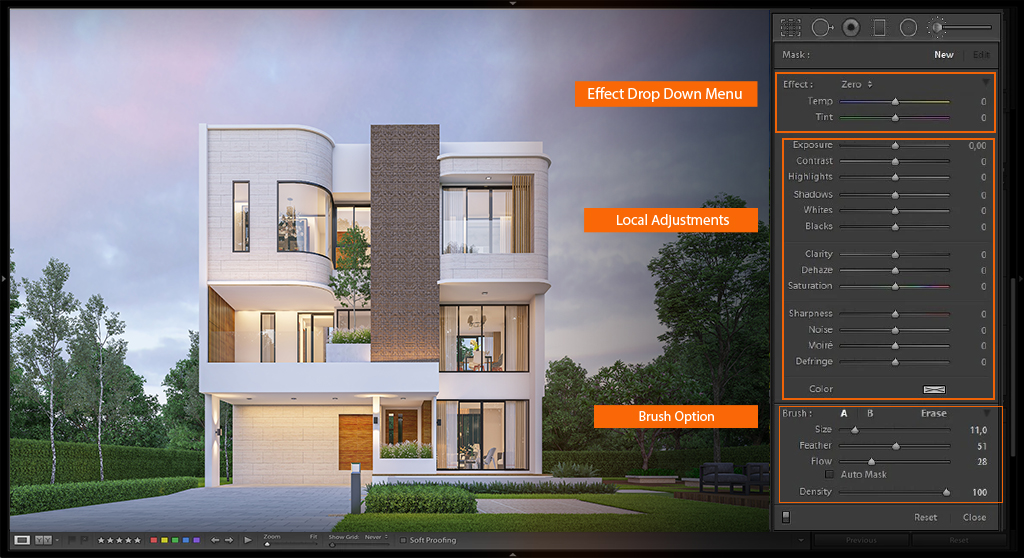
- When it comes to precise adjustments to specific areas, Local Adjustments are the best choice. Navigate to the Masking panel to use these features.
- If you want to adjust exposure, brightness, clarity, saturation, and contrast to specific areas of your image through “painting” use the Adjustment Brush tool.
- Linear Gradient tool comes in handy to add a gradually fading pattern with a straight line across the whole photo in any direction.
- Another powerful tool is the Radial Filter. It enables you to highlight particular areas of an image by creating several out-of-center, vignetted zones.
- If you want to adjust a photograph’s light or dark areas, Luminance Range is an excellent choice.
Step_10: Retouching the Product Image
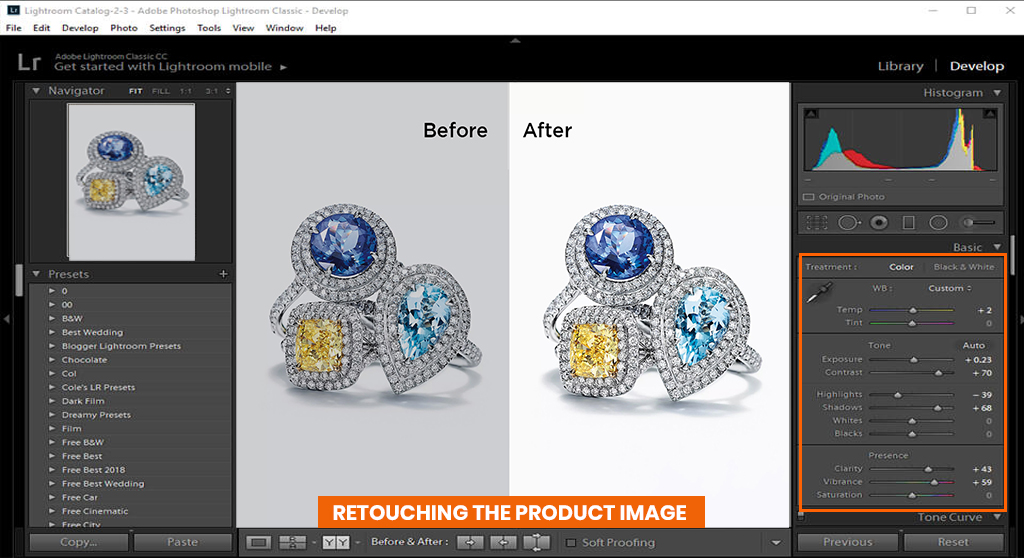
- Your e-commerce images may contain minor flaws that can still ruin the overall look. Maintaining a professional and polished appearance is highly important.
- Go to the Develop module area and select the Spot Removal Tool below the Histogram function from the left side. Use this powerful tool to fix spots, dirt, or any other distracting elements.
- Another helpful function is the Clone Tool, which is located below the Histogram. This healing tool is effective for cleaning up distracting elements in larger areas.
Step_11: Sharpening the Image
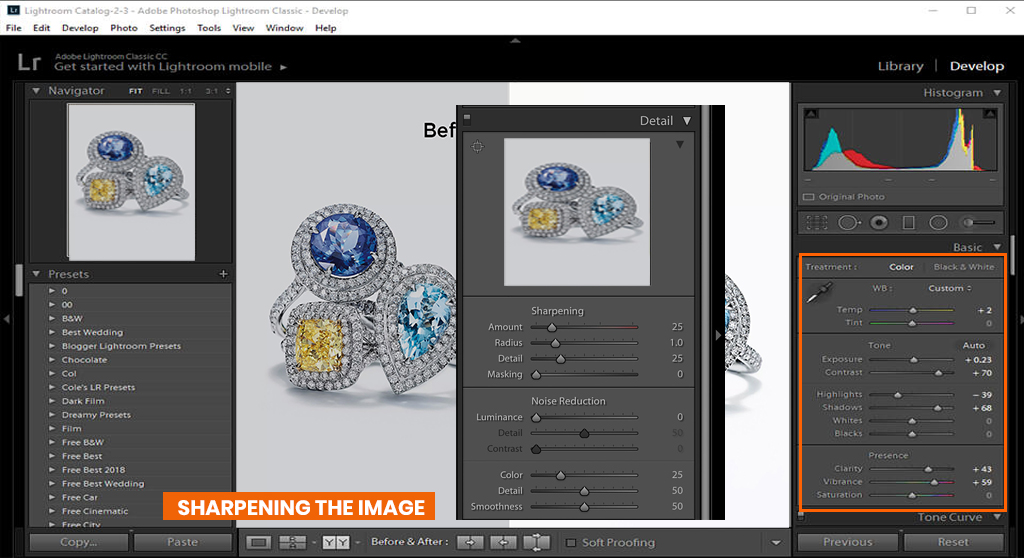
- The last step of post-production should be sharpening the photograph. But why should you do it at the end stage? It gives you a more customized and well-refined look that balances the final output size and viewing medium.
- Have you decided to apply sharpness to the entire image? Drop this idea. Sharpening the background and props in an image doesn’t add value. Only focus on the main area.
- Use the masking tool to select important areas of the item to sharpen. Press and hold the “Alt” button while tapping on the Masking function in the Sharpening section.
- You will see where the sharpening effect is applied. The modified result will appear in black and white on the screen. Moving the slider left will increase the sharpness level and vice versa.
You may also like to read… A Guide on How to Edit Jewelry Photos in Lightroom
Step_12: Exporting and Saving
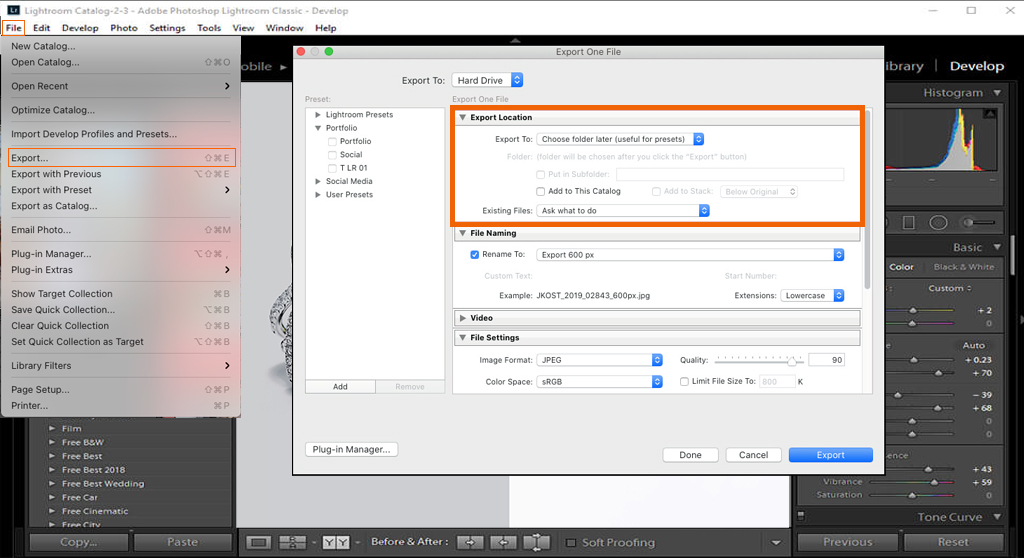
- Once you are done editing the ecommerce image perfectly, save it. Navigate to the File option from the upper left corner. Tap on the “Export” option.
- A new box will pop up. Choose the Destination Folder option above the preview area to determine where the edited images will be saved. That’s it!
5 Secret Lightroom Tricks Every User Should Know
Lightroom is well-known for its user-friendly functions. It has many powerful tools that are unknown even among regular users. The following are five killer tips to take your photo editing skills to a new height.
Tips_01: Use the Compare View Tool

- One of the most effective functions in Lightroom is the Compare View tool. It allows you to compare the two images to choose the best one.
- Navigate to the Library or Develop module and select View > Compare. Alternatively, press the “C” button on the keyboard.
- It keeps one image in the “Select” area and the other in the “Candidate” area. Use the right or left arrow key to switch between the photos.
Tips_02: Use Caps Lock Mode to Process Image Faster
- You might be dealing with hundreds of images. Cutting down the editing time speeds up your productivity.
- Turn on the Caps Lock button from the keyboard. This function automatically lets you move to the next image if it doesn’t match the specific label or rating.
- You don’t have to command any further instructions manually. This saves time and helps you quickly go through many photos in a row.
You may also like to read… How to Choose the Right Digital Photo Enhancement Services
Tips_03. Keep the Clipping Warnings Option On
- Sometimes, you might be so lost in photo editing that you don’t notice losing important details in images.
- When you make a photo too bright or too dark, it may cause losing important details. Simply press the “J” button from the keyboard to turn on the Clipping Warnings function.
- If the image loses details in bright areas, it will show a red warning sign. But if the photo has any details in dark areas, the system will show a blue warning sign. This helps you retain important details in images.
Tips_04. Light Out the Surrounding
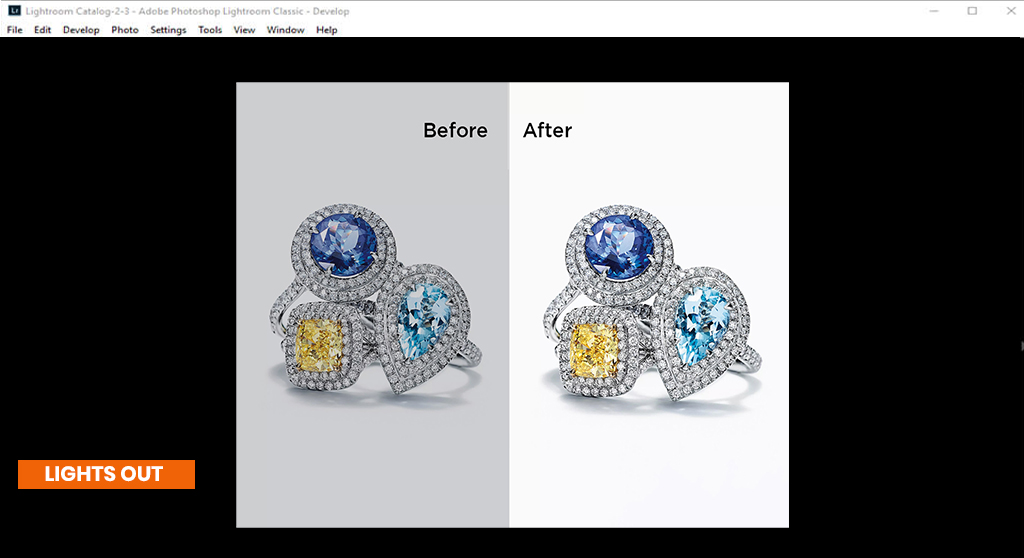
- Lightroom has a lot of functions and tools. They are visible from both sides of the screen. This may distract you from focusing on the main image.
- A simple solution is activating the “Lights Out” mode. Simply press the “L” button from the keyboard. Pressing the button a few times will gradually make it entirely darker. This enables you to concentrate on your editing fully.
Tips_05. Create a Personalize Logo
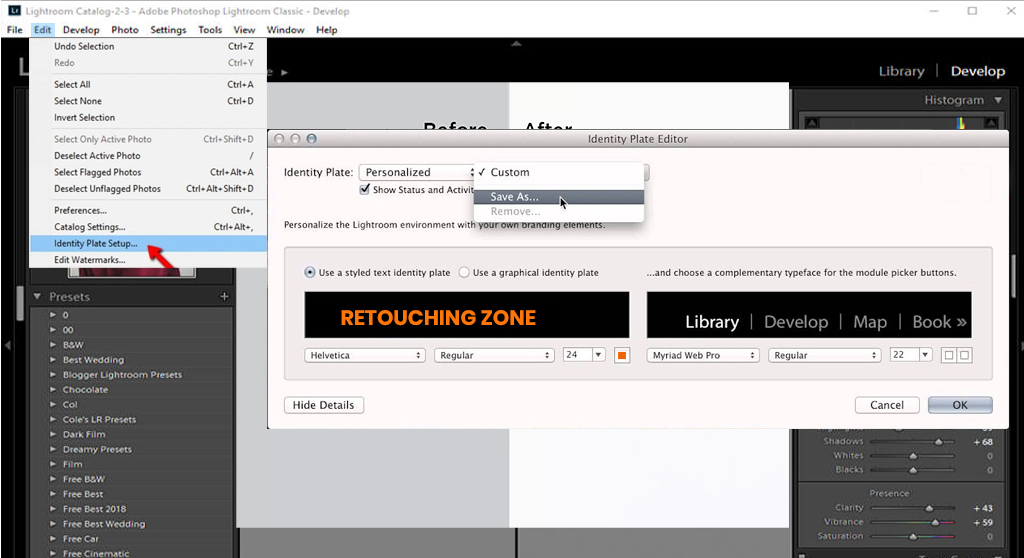
- Adding a personalized logo to your edited e-commerce images gives them a customized and professional look. You can use your own logo or signature to communicate your unique identity to the world.
- Navigate to the Edit area and select the “Identity Plate Setup” option. There are some pre-set identity plates available in the system. You can choose them any of them.
- Or create a new one by selecting the “Personalize” and “Custom” options. The system allows you to choose a styled text or graphical identity plate.
- If you already have a logo, upload it from your computer using the graphical identity plate option. Finally, hit the “OK” button.
FAQs
What is the best software to edit product photos?
Adobe Photoshop is considered the best professional software to edit product images. But experts also use Adobe Lightroom, Capture One Pro, and GIMP.
What is the difference between Lightroom and Photoshop?
Adobe Lightroom is ideal for managing, sorting, culling, and organizing various types of photos. In contrast, Adobe Photoshop is perfect for basic editing and complex retouching to create, manipulate, or enhance images.
What software do most photographers use?
Adobe Photoshop and Adobe Lightroom are the two most widely used software professional photographers use. Some may also use Capture One and Luminar too.
Which is the best tool in the Lightroom to edit product photos?
Boundary Warp, Lasso, and Gradient Filter are the three most popular tools for editing product images. They are effective for precise adjustments, background enhancement, and selective image editing.
What are the first adjustments to make in Lightroom for product photos?
Experts recommend starting with exposure, white balance, and contrast to keep the color well-balanced and accurate.
A Complete Guide on How to Edit Product Photos in Lightroom
Final Words
Regardless of the business you have, customers always prefer high-quality, realistic product photos. Crisp, clear visuals can attract, engage, and convert customers. However, the key is to know what type of editing and how much editing your product images are needed. You neither want under-editing nor over-editing. Maintaining a balance can help your business succeed. We have already discussed how to edit product photos in Lightroom in 11 simple steps. Our discussion also covered creative ways to use Adobe Lightroom to create stunning visuals.