To edit product Photos in Lightroom In this visual-centric world, high-quality product images can attract customers and create a strong desire among buyers to buy your products. It not only shows the attributes of your goods but also represents your brand personality.
Even after taking pixel-perfect shots, you must edit these items’ photos to make them align with your brand. Adobe Lightroom is one of the best choices for photo workflow and corrections. Let’s learn how to edit product photos in lightroom.
Why Use Lightroom for Product Photo Editing?
- Adobe Lightroom doesn’t permanently change or overwrite the original pixel data of an image. Hence, your edited photo and original photo won’t be affected.
- You can use the batch-processing technique to edit several images simultaneously to save time and effort. Copy your edited photos and paste them onto the rest of the pictures.
- This software has a strong catalog and tagging system to organize and manage them into smart collections and folders.
You may also like to read… A Guide on How to Edit Jewelry Photos in Lightroom
How to Edit Product Photos in Lightroom in 7 Steps?
The following are the steps to edit item images in Adobe Lightroom.
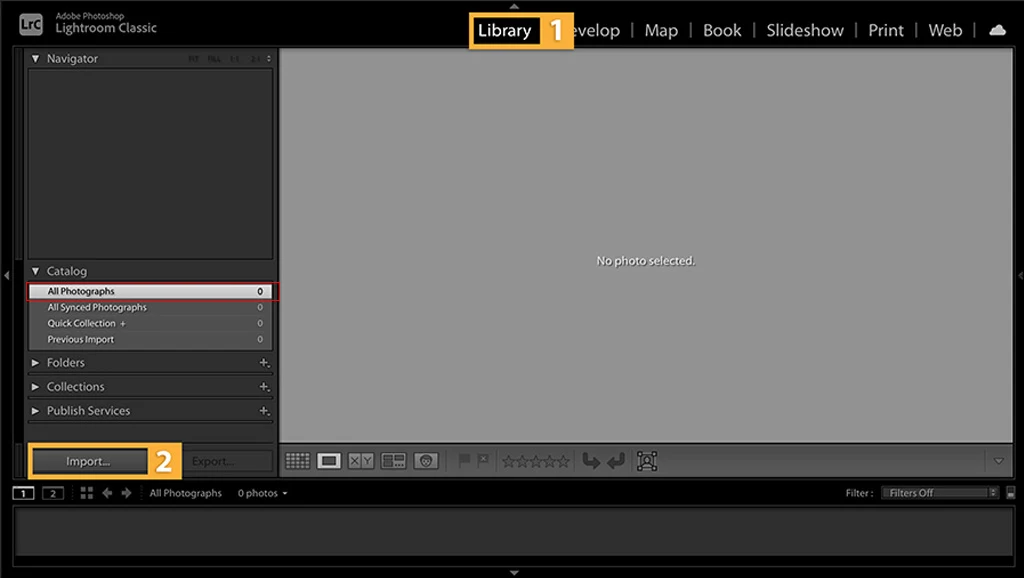
Step_01: Import Your Image
- Go to the Library module area. Select the “Import” option and tap on the particular product image you want to edit on your PC.
- You can also follow the drag-and-drop technique to choose it for product photo editing.
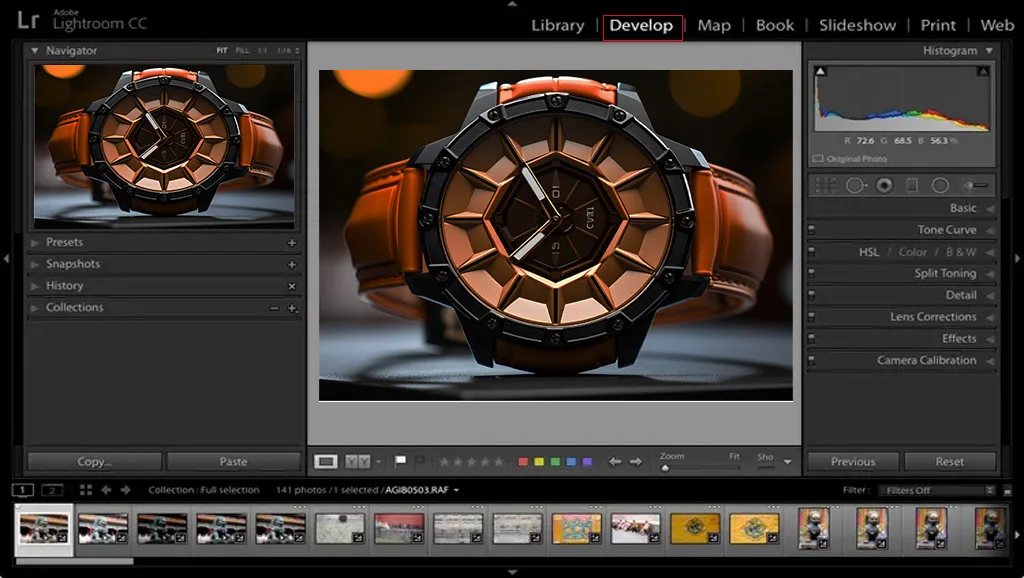
Step_02: Turn on the Develop Module
- Navigate to the top right corner of the interface and select the “Develop” tab.
- Alternatively, press your keyboard’s ‘D’ button and keep the right-hand panel open.
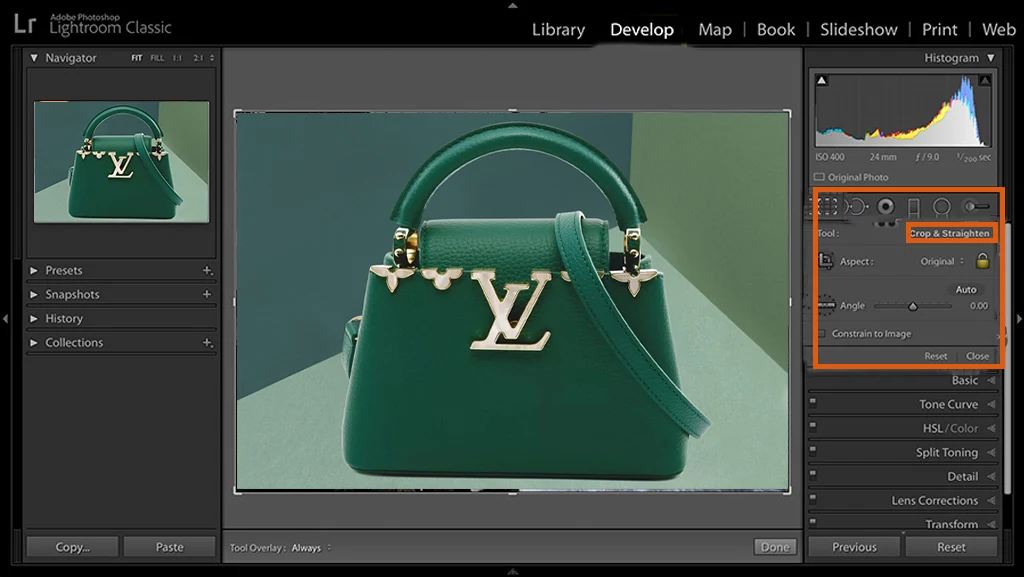
Step_03: Crop and Straighten the Image
- Head to the Develop Module section and tap on the Crop option. Set the crop boundary by using the dragging technique.
- Hit your keyboard’s ‘G’ key to use the grid view option. It enables you to refine the composition of the image.
- Is your picture a bit tilted? If so, use the Angle tool from the Crop & Straighten panel.
- Make the particular line level by dragging along part of the tilted line. Release the mouse to rotate the image automatically.
You may also like to read… How to Use Affinity Photo to Remove Background Easily
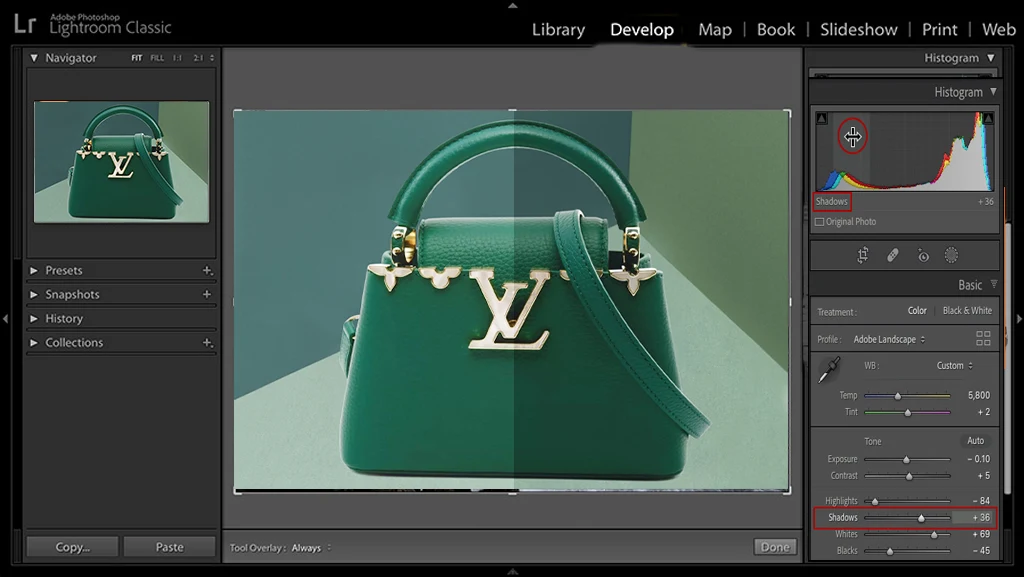
Step_04: Adjust Exposure and Contrast
- Go to the Develop module and tap the “Basic” panel on the right. Scroll the exposure slider left or right to adjust the entire image exposure or brightness value.
- If you want to change the difference between the lightest and darkest sections of a picture, use the contrast slider.
- Move the slide right to make the bright areas bright and dark regions dark a photo and vice versa.
Step_05: Correct White Balance
- Again, navigate to the Develop module and tap on the “Basic” panel from the right side.
- Move the Temperature slider left or right to adjust its warmth or cool level. Moving the slider to the right will make it blue, and the left will make it yellow.
- Next, scroll the Tint slider right or left to correct a color cast. You can also use the eyedropper tool found near the white balance section and choose a targeted neutral tone.
Step_06: Fix Imperfections
- Find the spot removal tool from the row of tool icons under the histogram section. Select the tool and choose the area you want to fix unwanted spots, dirt, or blemishes.
- If your image contains large distracting objects, use the Clone tool. It allows you to blend one part of the photo with another part of the picture.
Step_07: Enhance Colors and Textures
- Go to the Develop module and tap on the “HSL/Color” panel from the right side. There are eight separate options for each Hue, Saturation, and Luminance.
- Adjust these options to change into different colors and create unique and personalized color tones. Improve the clarity and texture of your image from the Basic panel, too.
Similar Reads for You
-
Photoshop vs. Lightroom: Best Choice for Photo Editing
-
How to Choose the Right Digital Photo Enhancement Services
Conclusion
Adobe Lightroom is a powerful tool for editing your e-commerce images and creating stunning visuals. It has various built-in presets to save time and effort. However, they must align with your product image and brand identity. Make sure to follow the steps of how to edit product photos in Lightroom sequentially.