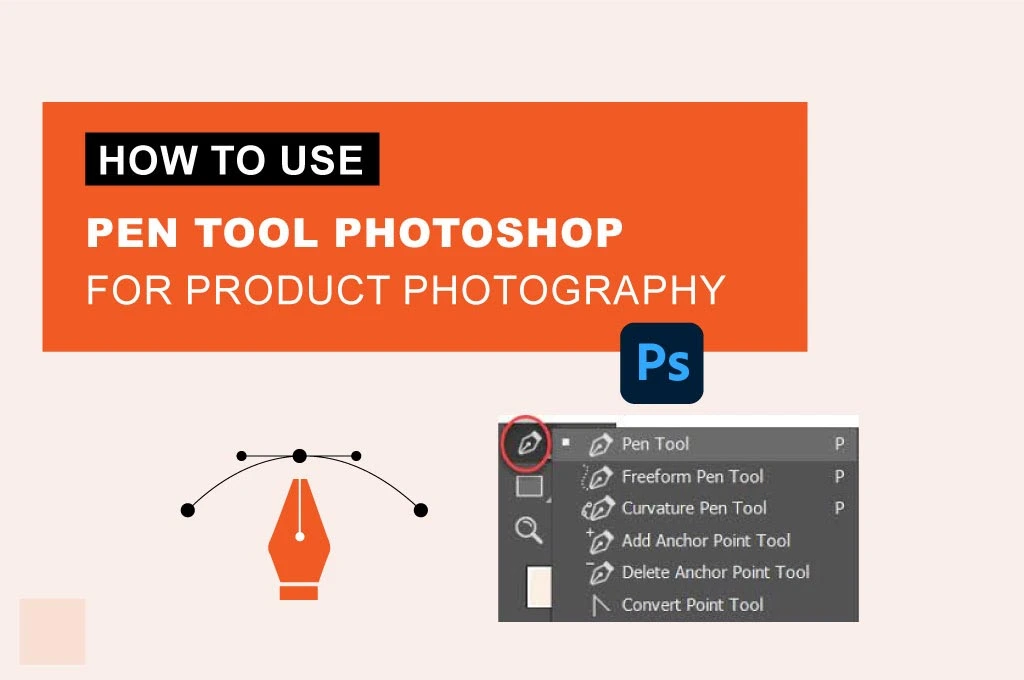
The pen tool in Photoshop is an excellent tool for editing your product image efficiently. It has a lot of features to bring an image with outstanding output. However, a large number of editors don’t know how to use pen tool in Photoshop for product photography.
What is the use of Pen Tool in Photoshop?
First, they must know about the pen tool’s features, such as the curvature, free-form, and magnetic pen. Almost every tool has a similar destination- make lines between points and generate paths. Using this tool, you can modify the paths, change the points, and create creative vector art. Furthermore, you should know about pen tool shortcuts for precise and quick editing. You can show excellent editing performance once you see the pen tool settings. A pen is a tool in Illustrator that allows for creating and editing anchor points and paths. It’s a simple selection feature that fills your draw with the highest accuracy. It creates paths and shapes, duplicating and manipulating them to generate complex selections. This tool is invaluable when isolating any object from the background. Also, it’s a great foundational tool for creating vector graphics.
Check it out for the best professional product image editing services for eCommerce.
Types of pen tools in Photoshop
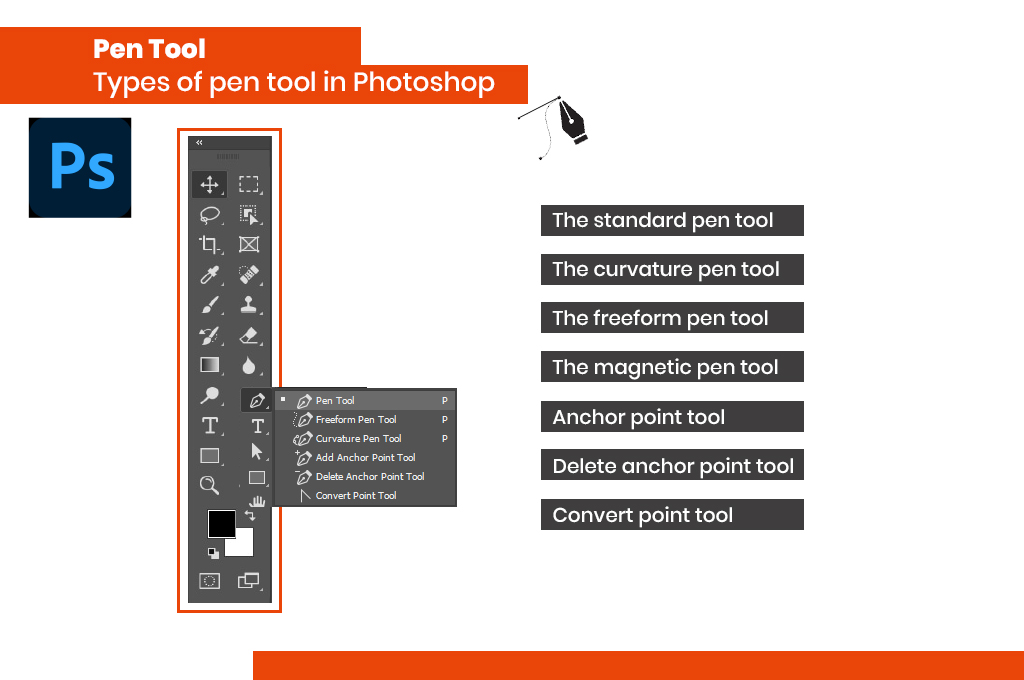
Photoshop CC 2019 primarily features four types of pen tools.
- The standard pen tool
- The curvature pen tool
- The freeform pen tool
- The magnetic pen tool
There are also three features of the Photoshop pen tool that exist in the pen tool segment.
- Anchor point tool
- Delete anchor point tool
- Convert point tool
What are the uses of the pen tool?
Every pen tool in Photoshop is mainly used to generate vector lines and make the editing process more manageable. Here, you learn Photoshop’s dedicated uses of all the pen tools.
The standard pen tool
It’s the most basic version of the Photoshop pen tool. Editors and vector artists use it to create complex selections, masks, and objects. Rather than drawing pixels on the image, it generates vector paths and makes your way easy. Professional photographers use this tool to remove any faulty background or make it transparent.
The curvature pen tool
The curvature pen tool in Photoshop is a simplified and optimized version of the standard pen tool. It’s widely used to draw complex shapes and paths. Using this tool, you don’t need to remember keyboard shortcuts and edit control handles. It’s mainly useful for beginner editors to remove any background from the image.
The free-form pen tool
The free-form pen tool is popular because of its high user convenience. It automatically adds the anchor points, allowing vector shapes to be drawn quickly. Its primary implementation is in vector art, also known as illustration work.
The magnetic pen tool
Photoshop has brought the magnetic pen tool feature to let artists draw more easily. It allows for the setting up of the range of the pen as well as the sensitivity. Changing the number of anchor points makes some creative creations possible. It’s an option of the free-form pen tool and has a similar application.
You may also like to read… What is Masking in Photoshop, Guide for Beginner
Creating curved path segments with the Pen Tool
Using the pen tool in Photoshop Elements, creating a curved path segment is much easier. Here’s the detailed process of this job.
Step 1- Select shape mode
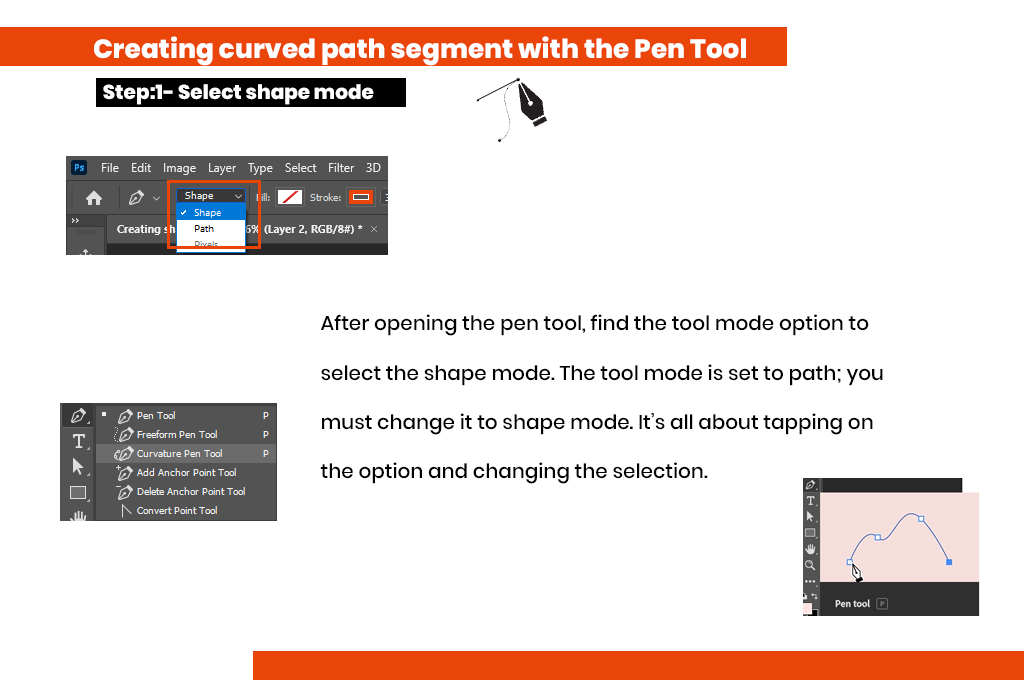
After opening the pen tool, find the tool mode option to select the shape mode. The tool mode is set to path; you must change it to shape mode. It’s all about tapping on the option and changing the selection.
Step 2- Add a starting point
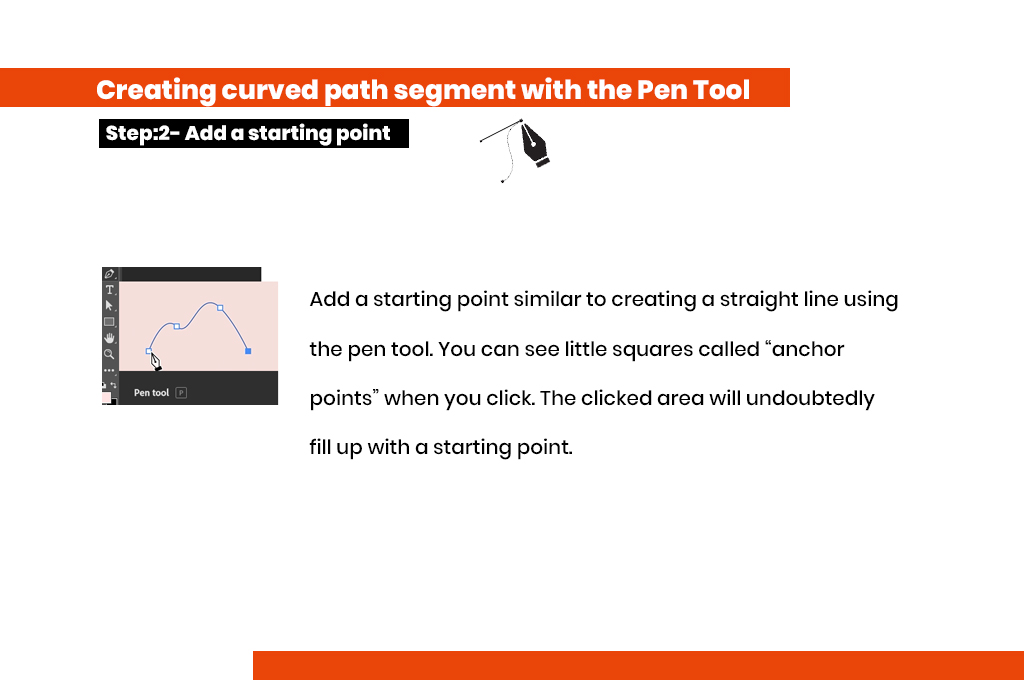
Add a starting point, similar to creating a straight line using the pen tool. You can see little squares called “anchor points” when you click. The clicked area will undoubtedly fill up with a starting point.
Step 3- Generate the curved path
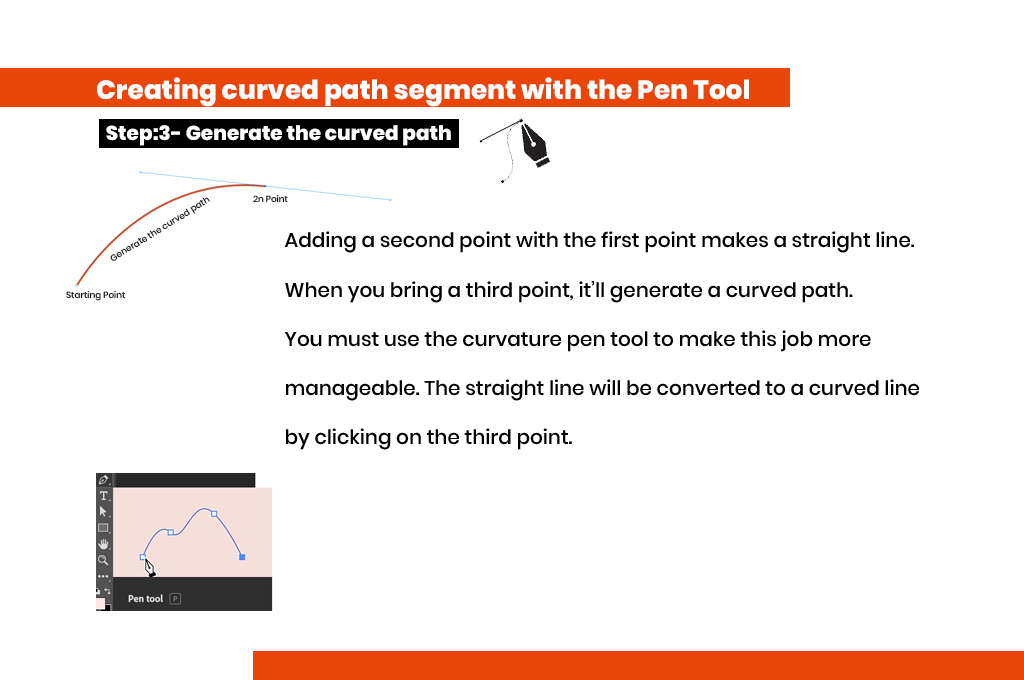
Adding a second point to the first point makes a straight line. When you bring a third point, it’ll generate a curved path. You must use the curvature pen tool to make this job more manageable. The straight line will be converted to a curved line by clicking on the third point.
Step 4- Add more points
I suggest making the path more curved for a specific purpose. There is an “add more points” segment for doing this job. To add a fourth anchor point, tap using the cursor. The position will be the vertical line along the right, and the horizontal guide in the centre will intersect. Create a straight path segment with the Pen Tool after a curved path segment. The pen tool is enough to create a straight path segment after a curved path segment. Let’s see how it works. First, choose the pen tool from the menu. Then, click on the drag anchor point in the direction of the curve. Next, click-drag a new anchor point to generate a curved line. Now, your turn is to create a straight-path segment. Click once on the last anchor point, and the operation will be executed. By clicking on the point, you can complete the process of generating the straight line. If you drag it, it won’t work.
Close your path with the Pen Tool
To close a path, you must move the cursor over the hollow anchor point. Then, look for a circle that will appear next to the cursor. Now, press the Shift key and click the endpoint. The path will be closed instantly. Tap the Escape button to stop drawing a path without closing it.
Save your path
Saving the path isn’t necessary when using the pen tool to make selections. If you’re interested in doing it, you can find it easily. The active path will be represented as the “work path”. Tap on that name and then rename it whatever you want. The path will be saved then.
Modify an existing path with the Pen Tool
Modifying an existing path segment is also known as altering the path segment. Find the Direct Selection tool from the toolbox to change a path segment. Then, hold down the Control key for Windows to modify an existing path with the pen tool. Press the Shift-click to add or remove any point from the previous selection. You can also drag across anchor points to select them. For Mac users, using the command key is an easy option.
Add additional paths to an existing path using the Pen Tool.
Using the pen tool, you can add straight and curved paths to an existing path. Understanding Pen Tool Photoshop tutorials precisely will help you more in this job. Select the shape mode first to add a straight line to an existing path. Then, add the fourth anchor point to the existing path. Consider the fourth point as the first point of the new path. The residual method is simple: draw a curved or straight line according to your desire.
Modify existing points and curves along a path.
Editors never prefer modifying paths using Brazier curves. So, open the Curvature Pen tool in Adobe Photoshop to create paths easily. You can easily do this by pushing and pulling segments to modify them. Create the first point using the pen tool to start this action. Then, trace around the curved shape by clicking once to place each point. You should add extra points to get finer control over the curve. If you want to delete any additional points, click the point. After that, press Delete, and the existing point will be modified. You can easily switch between the corner and smooth points by double-clicking a point.
Add new points to a path.
Adding new points to a path is already acknowledged by you. You’ve learned how to add new points in the part about creating a curved and straight path segment. Once the path is created, you can easily add new points to the existing path.
Remove points from a path.
If you know how to modify the existing straight or curved line, then you know the removal process of a point. To remove any extra points, click on that point. After that, press the Delete button and get a new path.
Create a selection from a path.
You need to select two points from a path to create a selection between two points. A line will automatically be generated between them. By using Alt/opt- you can drag the lines to change them.
E-commerce Product Photo Clipping Path
E-commerce or fashion retailers are finding clipping path service providers. You also need to get background removal services for thousands of products. Countless hours of photo editing are impossible for you to do in-house cost-effectively. Most online marketplaces, such as Amazon and eBay, require you to use product photos on a white background. We also understand that Best Clipping Path services are not for just white backgrounds. However, we can create single-color backgrounds for ads or other creative product photos.
Our hand-drawn clipping path makes sure you have the background of photos removed. Thus, images capture the details of your products and make consumers click to buy them. We fulfil every order, ensuring you have professionally edited images that bring your products to life.
Why Is Learning the Pen Tool in Photoshop Worth Your Time?
Accuracy is the first and foremost criterion when dealing with any image. The pen tool in Photoshop ensures the most accurate selection among all conventional tools. Think about creating pixels on your desired line and cutting out the part. This process is too lengthy, industrious, and not worth your time. The pen tool in Photoshop helps you fill in and stroke whatever you draw. You can create valuable shapes and perform your actions quickly.
The learning pen tool Photoshop permits the duplication of most curves in the real world. So, your editing session will be easy, and you can save a lot of time using this tool.
Pen tool setting overview
After entering the standard Pen Tool, you can select the curvature or freeform pen tool. Photoshop allows you to set the setting to either Path or Shape. It can quickly be done from the option bar at the top of the application window. You can change the shape’s stroke colour, thickness, and fill colour by choosing the shape settings. The anchor point tool helps in converting smooth anchor points into corner points. All you need to do is click on the “add anchor point tool”.
Pen tool location in Photoshop
You can find the pen tool in Photoshop in the lower half of the Toolbar. The pen tool Photoshop icon looks like the “ink pen” of the old period. When you click on the icon, six different options of the pen tool Photoshop will appear in front of you.
Though the Photoshop CC 2018 and 2019 versions have six tools, the older versions have only five. However, if the pen tool isn’t visible, you can fix this by simply resetting the pen tool.
Pen tool Photoshop shortcuts
Some pen tool Photoshop shortcuts may make your work more manageable. All you need to do is tap on the keyboard with the right buttons.
- P: allows you to use the pen tool
- CTRL / CMD: allows using the direct selection tool
- ALT / OPTN: enables the anchor pointing tool
- +: Enables the Add Anchor Point Tool.
- –: Enables the Remove Anchor Point Tool.
How to use the Convert Point tool
Follow the steps to use Photoshop’s convert point tool in your pen tool.
- Visit the Toolbox first
- Select the Convert Point Tool from there
- Click on a smooth anchor point
- Drag away from a corner anchor point
- Wait to convert it to a smooth anchor point.
How to use the pen tool in Photoshop to cut out images
Try the Photoshop pen tool to practice images before cutting out an image. Here’s how you should proceed.
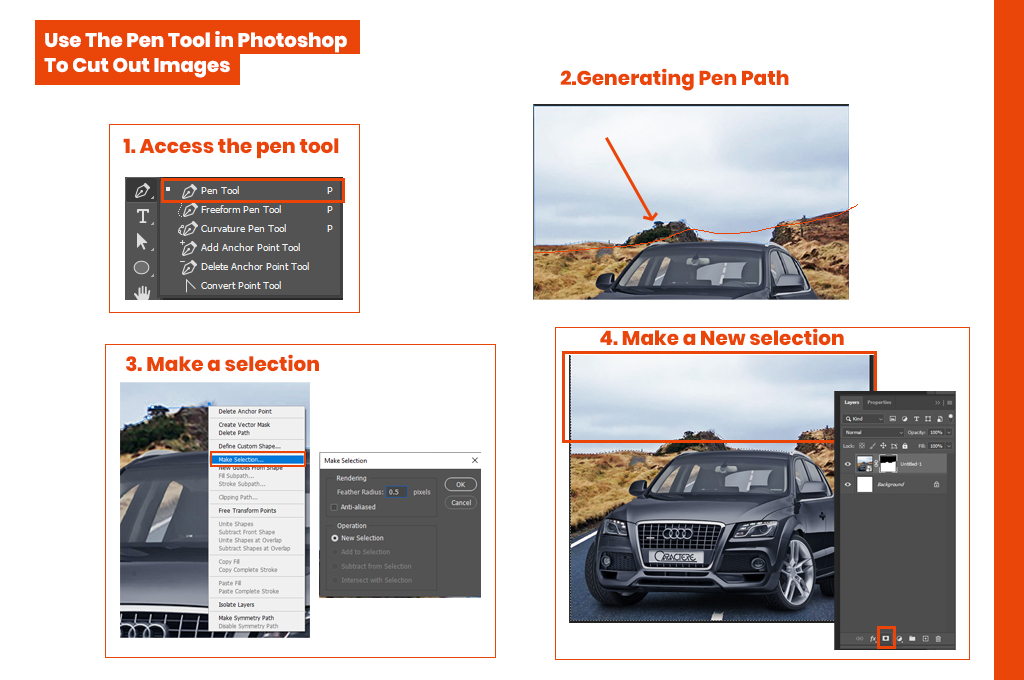
Step 1- Access the pen tool
To access the pen tool, click on the Pen tool icon. You can also start by pressing P on the keyboard.
Step 2- Generating pen path
Use the “add an anchor point” option to generate a path. Move the cursor across the target area and end by the target point. A straight line will automatically be generated between your selected location.
Step 3- Make a selection
Now, right-click inside the recently created path and select the ‘Make Selection’ option. When the selection dialogue box appears, set the radius to 0.5. Furthermore, you need to leave anti-aliased checks off.
Step 4- Make a new selection
Set the operation to the “new selection” and click “ok”. It’s time to select the layer you want to cut out. After selecting the layer, press on the layer mask icon. The residual process is automated. The active selection will be automatically applied to your layer mask. The image will be cut out from its background.
You may also like to read… How to Deep Etching in Photoshop
How to fill color in the pen tool
Go for Ctrl/right-click the path from the Paths tab on the right. Select the Fill Path segment to create a shape from it. Don’t forget to change the contents to either Foreground or background. The selection depends upon the colour swatch you prefer. Now, specify a foreground or background colour. By selecting the area to fill with color, your command will proceed. You can fill an entire layer by selecting the layer in the Layers panel.
Transform or scale a shape Path
This part is discussed in the previous segment. Please check out the part “modify existing points and curves along a path” for better understanding.
Other Pen Tool options
You’ve known about the pen tool options earlier. Here, we briefly reveal their prime works.
Curvature Pen Tool
Draw complex shapes and paths without the need to edit control handles.
Free-form Pen Tool
It allows you to draw vector shapes and various paths conveniently.
Magnetic Pen Tool
Permits the artist to draw a path that snaps to the edges of defined areas on the drawing.
Draw with the pen tool in Photoshop.
The pen tool in Photoshop allows you to draw figures by connecting various points.
Create a shape using the Pen Tool.
The parts above have already discussed creating a shape using the pen tool. Have a look over there for both straight and curved shapes.
You may also like to read… Understanding Professional Photo Retouching and its Importance!
How to use the pen tool to crop images in Photoshop?
The pen tool doesn’t allow cropping off any image quickly. You can cut out part of the image by following the previous step. But it’s not accurate, and the output won’t be pleasing. So, what’s the best way?
Select Picture Tools from the toolbox. Then, go to Format and then Size. By clicking Crop under the Crop heading, your half the work is done. Now, select the aspect ratio and click the corresponding ratio. The image will be cropped easily.
Removing the background with the copy selection
The copy selection tool isn’t directly available to remove a background from an image. The steps are pretty simple.
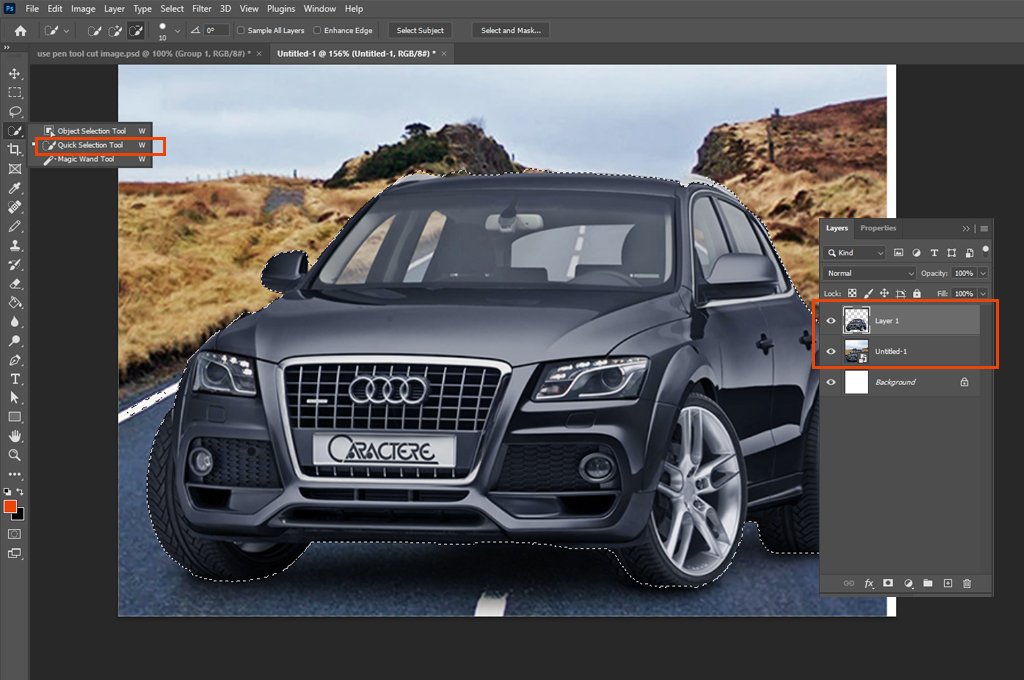
- Open the desired image
- Select the quick selection tool
- Make the selection of the desired area
- Tap on the “layer via copy.”
- Get the subject image in a new layer
Removing the background with a layer mask
Follow the steps carefully to remove the background with a layer mask.
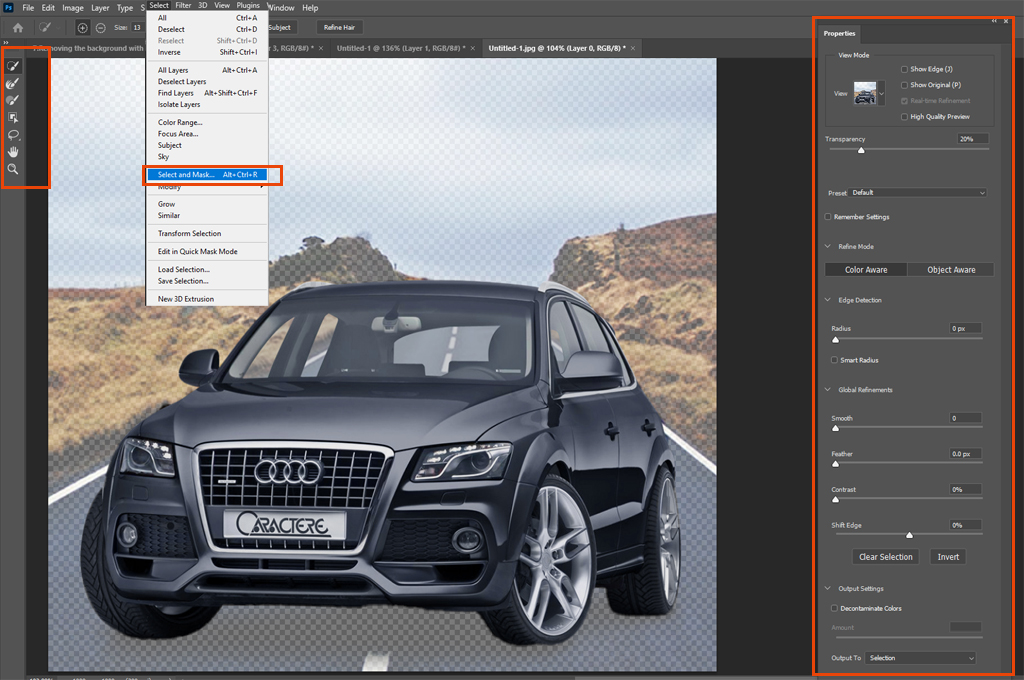
- Go to Select > Select and Mask
- Select the Foreground now
- Use the quick selection tool to refine the selection
- Improve the mask edge
- Visit the drop-down menu “output to” now
- Select the layer mask from there
- Add a new background now (optional)
Clipping Path Service
Clipping Path Photoshop is an integral part of an image editing service. At Retouching Zone, we create images that do not look like they have been edited because we make images with perfectly drawn clipping paths. We know that when it comes to clipping paths, it is essential to give detailed attention. And it is required for a lifelike image. You need perfect and precise clipping paths and photo Cut-outs. So, your consumers will feel attracted to your products, and clients will love your photos. Our small attention to each detail makes impressive and realistic images. Our photo editors use the Photoshop pen tool to hand draw every clipping path. And achieve clean, polished edges on all your images. When you come to us for image editing, you always get accurate results. Then, clean clipping paths regardless of the role of images in your work.
Retouching Zone is always dedicated to delivering the best clipping path service to help you meet tight deadlines and stay within budget. We pride ourselves on providing high-quality clipping path service.
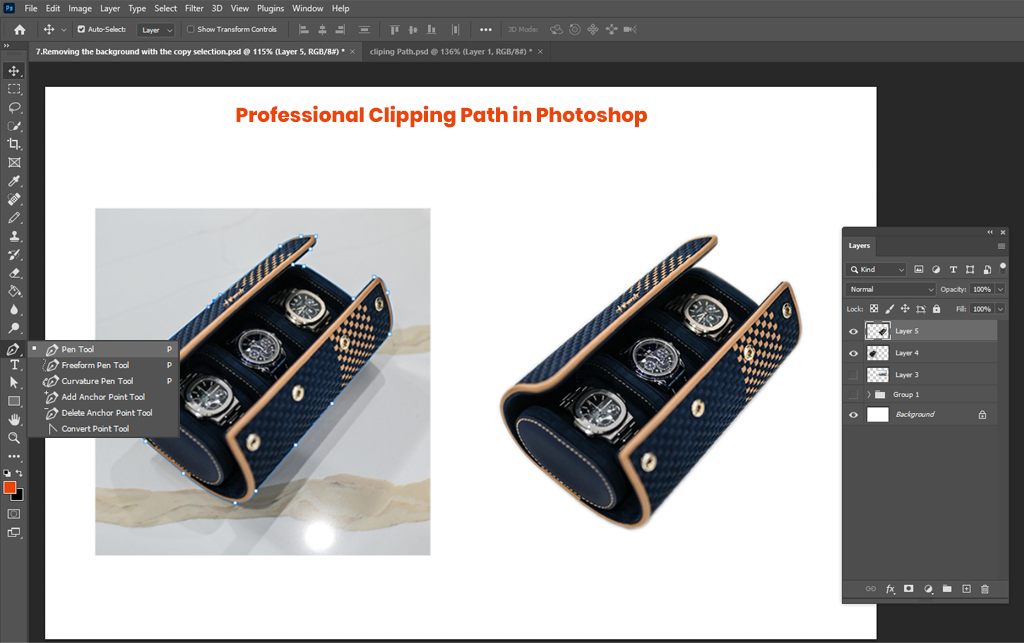
Professional Clipping Path in Photoshop

If the photographs of your products look good, it will attract more consumers and increase your sales. We must remember that today’s consumers are more intelligent than ever as they seek higher-quality experiences. So, your product photography has to meet that challenge. We help your product photographs to be more visually appealing to your consumers. 40% of online consumers want to see products on a white background.
Similar Reads for You
What is a Photo Composite and How to Create One?
Conclusion
Using the pen tool in Photoshop isn’t easy unless you’re a master at it. A lot of practice is mandatory for making excellent output. After learning how to use the pen tool Photoshop for product photography, you don’t need to meet an editor. The most important part is using the right tool for a specific job. For example, you have better tools for cropping an image than the pen tool. The pen tool has advantageous features to make specific jobs easier. All you have to know is how to use pen tool in Photoshop and which tool is suitable for which purpose. Start practising by joining two points and generating a straight line. Then, you can connect three points and develop a curved line. You can easily modify the paths and draw amazing art as an expert.

